Adding GitHub OAuth Authentication to a Phoenix App
Phoenix evolves at a fast pace. This tutorial on integrating OAuth into a Phoenix app will help you stay up to date with it.
The new year has arrived, the resolutions made for it are already a distant memory, and at last there is a moment to invest in our growth as Programmers :) . In my humble opinion, nothing broadens your perspective better – particularly in the Functional Programming world – than exploring other languages and fresh frameworks, seeing how they approach problems, and perhaps drawing inspiration or adding new tools to your toolbox.
Since Phoenix and Elixir keep gaining popularity (judging at least by the Stack Overflow Developers Survey for 2022), I decided to try them out.
Elixir is a functional language, yet it is dynamically typed, which comes across as quite odd to someone who has written Scala for many years. Still, it is enjoyable – at least it has been in the handful of projects I have built with it so far. Anyone who has ever written something in Ruby On Rails (as I did a few decades ago ;) ) will soon notice that it is practically the same idea, only powered by a functional programming language underneath, and that feels really good.
The Phoenix framework can prove to be a useful tool – certainly for simple microservices offering CRUD features, the kind we used to build with Play framework, but potentially for far more, all the way to a complete production application, particularly thanks to its LiveView feature, which this tutorial does not cover.
The first obstacle you are likely to run into while exploring the framework and experimenting is that Phoenix changes a lot, so many things do not behave as described when you follow online tutorials or courses that are more than about a year old. I ran into exactly this while trying to use the OAuth library with a 3rd party provider, which is why I decided to add one more blog post about OAuth with Phoenix. Below you will find every step needed to integrate OAuth into your Phoenix application. Enjoy!
First Steps
1 Set up a new project
mix phx.new oauth_tutorial
When prompted to download dependencies, choose ‘Y’
2 Edit config/dev.exs to configure the credentials for your db server
# Configure your database
config :oauth_tutorial, OauthTutorial.Repo,
  username: "postgres",
  password: "your-password-goes-here",
  hostname: "localhost",
  database: "oauth_tutorial_dev",
  stacktrace: true,
  show_sensitive_data_on_connection_error: true,
  pool_size: 10
3 Add the logic for storing and managing users
mix phx.gen.schema Accounts.User users email:string:unique provider:string token:string
Running this command gives us
- a fresh context named
accountsinlib/oauth_tutorial/accounts - a User schema named
user.exinlib/oauth_tutorial/accounts/user.ex - a migration file stamped with its creation time in the
priv/repo/migrationsfolder
Schema
defmodule OauthTutorial.Accounts.User do
  use Ecto.Schema
  import Ecto.Changeset

  schema "users" do
    field :email, :string
    field :provider, :string
    field :token, :string

    timestamps()
  end

  @doc false
  def changeset(user, attrs) do
    user
    |> cast(attrs, [:email, :provider, :token])
    |> validate_required([:email, :provider, :token])
    |> unique_constraint(:email)
  end
end
The user schema holds every field definition we supplied as arguments to the Phoenix schema generator. On top of that, the framework automatically adds a few fields (created_at, updated_at) through the timestamps() method at the end of the schema definition. We are free to remove it, of course, but keeping it does not hurt, at least in a project like this one.
Migration
defmodule OauthTutorial.Repo.Migrations.CreateUsers do
  use Ecto.Migration

  def change do
    create table(:users) do
      add :email, :string
      add :provider, :string
      add :token, :string

      timestamps()
    end

    create unique_index(:users, [:email])
  end
end
The Phoenix framework relies on the Ecto library for all database interactions, along with a migration mechanism that lets us build the database schema, alter existing tables, add indexes, and so on.
Run the migration to create the database and the single users’ table described in the migration file generated by the previous command.
mix ecto.create - creates a database on our db server
mix ecto.migrate - executes the migrations found in the migrations folder
You can now log in to your database and see the tables that were created for you; the users’ table includes extra fields produced by the timestamp() call in our schema.
Auth Controller
Next, define a controller responsible for our authorization logic: it will let us log in to and out of the application and receive data from our third-party OAuth provider (GitHub in this case) as part of the standard OAuth authentication flow.
Before writing the controller code itself, we have to add a library to the project that will assist us with OAuth authentication. It is called Ueberauth and offers integrations with a wide range of providers. You can find more about the library on the project’s GitHub pages here.
Add two dependencies to the deps function in the mix.exs file:
{:ueberauth, "~> 0.7.0"},
{:ueberauth_github, "~> 0.8.1"}
Edit the config file once more and append two new entries at its end:
config :ueberauth, Ueberauth,
      providers: [
        github: {Ueberauth.Strategy.Github, [default_scope: "user:email"]}
      ]
config :ueberauth, Ueberauth.Strategy.Github.OAuth,
 client_id: "your-client-id",
 client_secret: "your-client-secret"
To obtain the clientId and clientSecret values, log in to your GitHub account and go to Settings -> Developer Settings (at the very bottom) -> OAuth Apps -> New OAuth App
With the library added and the configuration in place, we can once again turn to our friend mix to fetch and install the dependencies:
mix deps.get
Now we can create the controller and run a few basic checks to see whether the integration works as intended.
Create a file named auth_controller.ex in the lib/oauth_tutorial_web/controllers directory.
For the time being, the only thing this controller will contain is the callback function that processes the authentication result sent by GitHub. To make the controller use the Ueberauth library, we have to plug Ueberauth, and then we are nearly done.
defmodule OauthTutorialWeb.AuthController do
 use OauthTutorialWeb, :controller
 plug Ueberauth

 def callback(conn, params) do
   IO.inspect(conn)
   IO.inspect(params)
 end

end
However, the controller will only work once routing is configured in the project’s router.ex file. We will add a new scope for the authentication logic, which for now handles just 2 requests:
1 one that the Ueberauth library handles on its own to send us to our provider
2 one that processes the callbacks coming back from the provider.
scope "/auth", OauthTutorialWeb do
 pipe_through :browser

 get "/:provider", AuthController, :request
 get "/:provider/callback", AuthController, :callback
end
You may have already spotted that our callback function merely inspects the incoming data. That is not how Phoenix normally handles requests in controller methods, so expect a large exception once this method returns – but the console will show you all the data GitHub sent after a successful authentication.
Launch the application with mix phx.server and open http://localhost:4000/auth/github. You should be redirected automatically to a GitHub authorization page, where you can allow a new app to use data from your account. After you authorise it, Github redirects the call to our callback method, which prints the received values along with a big fat exception about the conn object not being handled properly – don’t worry about it yet, we will deal with it shortly.
Next, let’s persist some of the data received from GitHub and create a new user in our database.
Storing the data
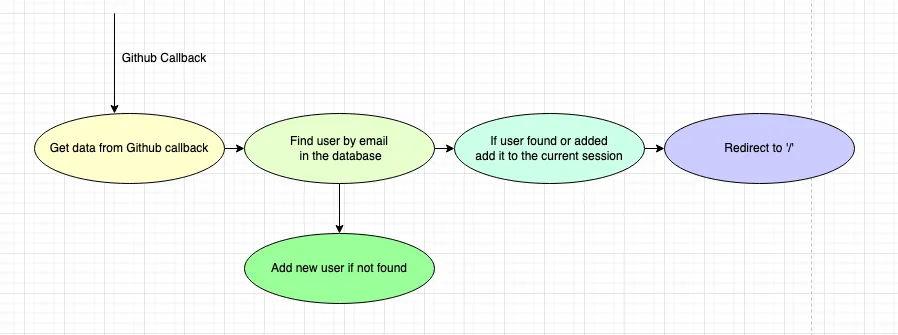
We will go through the steps shown in the diagram above. To begin with, we pull out the information required to create a new user in the database. To do that, we pattern match on the argument list of our callback function:
def callback(%{assigns: %{ueberauth_auth: auth}} = conn, params) do
  user_data = %{token: auth.credentials.token, email: auth.info.email, provider: "github"}
    ……
end
Once we have the data, we can either look up an existing user by the supplied email or create a new one if no such user exists. This requires building a schema changeset and calling a few repo methods. Let’s write a method that finds an existing user or creates one, based on the map of parameters delivered with the callback:
defp findOrCreateUser(user_data) do
 changeset = User.changeset(%User{}, user_data)
 case Repo.get_by(User, email: changeset.changes.email) do
   nil ->
     IO.puts("User not found, creating new one")
     Repo.insert(changeset)
   user -> {:ok, user}
 end
end
After that, we can wire in this method and carry out the remaining logic inside the callback function, as follows:
def callback(%{assigns: %{ueberauth_auth: auth}} = conn, params) do
 user_data = %{token: auth.credentials.token, email: auth.info.email, provider: "github"}
 case findOrCreateUser(user_data) do
   {:ok, user} ->
     conn
     |> put_flash(:info, "Welcome to OAuth Tutorial!")
     |> put_session(:user_id, user.id)
     |> redirect(to: "/")

   {:error, changeset} ->
     conn
     |> put_flash(:error, "Something went wrong")
     |> redirect(to: "/")
 end
end
Start the application again with mix phx.server, and a flash message should appear on the main page.
Log Out functionality
Logging in is only half of the story – once logged in, we also need a way to log out and clear the session. To achieve that, we add a new controller method and map it to an endpoint of our choosing in the router.ex file.
def signout(conn, _params) do
 conn
 |> configure_session(drop: true)
 |> redirect(to: Routes.page_path(conn, :index))
end
get "/signout", AuthController, :signoutMake sure this route is placed before the /:provider route; otherwise the provider route will match first and treat the word signout as a kind of OAuth provider.
Widget
We now have both login and logout, and it would be handy to place them in a shared part of the template where we can check the session status and trigger the login/logout actions accordingly.
In the default template we will show either a Log In or a Log Out link alongside the other links in the top right corner of the header.
Even though our session object holds user_id, it would be far more convenient to have a user object whose properties we can read, for example to set an avatar based on the user’s email address. To get one, we will rely on a handy Phoenix utility called a plug. We will write a small plug that becomes part of the request pipeline: it checks whether the user_id is present in the session, fetches the corresponding user object from the database and assigns it to the connection object, making it available globally wherever we need it.
defmodule OauthTutorial.Plugs.SetUser do
 import Plug.Conn
 import Phoenix.Controller

 alias OauthTutorial.Repo
 alias OauthTutorial.Accounts.User

 def init(opts), do: opts

 def call(conn, _opts) do
   user_id = get_session(conn, :user_id)
   cond do
     user = user_id && Repo.get(User, user_id)->
       assign(conn, :user, user)
     true ->
       assign(conn, :user, nil)
   end
 end
end
To put the plug to use, just add it to the request pipeline in the router.ex file:
pipeline :browser do
 plug :accepts, ["html"]
 plug :fetch_session
 plug :fetch_live_flash
 plug :put_root_layout, {OauthTutorialWeb.LayoutView, :root}
 plug :protect_from_forgery
 plug :put_secure_browser_headers
 plug OauthTutorial.Plugs.SetUser
end
Lastly, extend the list in the header with a few more items. The header is defined in oauth_tutorial_web/templates/layout/root.html.heex
<ul>
 <li><a href="https://hexdocs.pm/phoenix/overview.html">Get Started</a></li>
 <%= if function_exported?(Routes, :live_dashboard_path, 2) do %>
   <li><%= link "LiveDashboard", to: Routes.live_dashboard_path(@conn, :home) %></li>
 <% end %>
 <%= if @conn.assigns[:user] do %>
 <li><%= link "Logout", to: Routes.auth_path(@conn, :signout) %></li>
 <% else %>
 <li>
   <%= link "Sign in with Github", to: Routes.auth_path(@conn, :request, "github") %>
 </li>
 <% end %>
</ul>
Excellent – by now you should be able to log in and out using GitHub as the OAuth provider. In the final part of this tutorial, we will protect some resources against unauthorised access; in other words, we will create a web resource that becomes visible only once you are logged in.
Protecting Resources
Let’s generate to-do list functionality in our Phoenix application. In Phoenix this naturally takes just a few commands:
mix phx.gen.html Todos Todo todos content:text user_id:references:users
Next, we will tweak our schemas a little to tell Ecto that a single user can own many to-do items and that each to-do item belongs to one particular user. To do so, adjust the schemas like this:
User schema:
schema "users" do
 field :email, :string
 field :provider, :string
 field :token, :string

 has_many :todos, OauthTutorial.Todos.Todo

 timestamps()
end
Todo schema:
schema "todos" do
 field :content, :string

 belongs_to :user, OauthTutorial.Accounts.User

 timestamps()
end
Now let’s update router.ex to enable handling of todos:
scope "/", OauthTutorialWeb do
 pipe_through :browser

 get "/", PageController, :index
 resources "/todos", TodoController
end
As shown above, rather than declaring each method such as GET/POST/PUT/DELETE individually, we use Phoenix’s built-in resources macro, which generates ‘Restful’ routes for the given resource on our behalf.
You can now open the application, go to /todos and experiment with the Todo functionality.
Time to protect our todos from unauthorised access. We will write one more plug that checks whether you are logged in and, if you are not, redirects you to the home page with a suitable flash message stating that the requested resource could not be accessed.
defmodule OauthTutorial.Plugs.RequireAuth do
 import Plug.Conn
 import Phoenix.Controller

 alias OauthTutorialWeb.Router.Helpers, as: Routes

 def init(_params) do

 end

 def call(conn, _params) do
   if conn.assigns[:user] do
     conn
   else
     conn
     |> put_flash(:error, "You are not authorized to access requested page.")
     |> redirect(to: Routes.page_path(conn, :index))
     |> halt()
   end
 end
end
We will not use this plug in the router; instead, it goes straight into the controller, where we state explicitly which methods should be protected. This way you could, for instance, let every user list todos while restricting data modification to authorised users only.
In the freshly generated todo_controller.ex, plug in require_auth as follows:
plug OauthTutorial.Plugs.RequireAuth when action in [:index, :new, :create, :show, :edit, :update, :delete]If you attempt to open the todos page without logging in, you should get the unauthorised access message, as shown below:
For convenience, we will add a link to the todos page next to the other links on the right side of the header (in place of the default Get Started link)
<li><%= link "Todos", to: Routes.todo_path(@conn, :index) %></li>Final notes
This tutorial turned out fairly long, since I wanted to walk through every step in detail, but in essence adding OAuth to your Phoenix application comes down to a few imports, a few more configuration changes and a custom plug or two that integrate OAuth into your app.
I hope you enjoyed it!