Preview environments for Code reviews, part 3: Configuring the Reverse-proxy
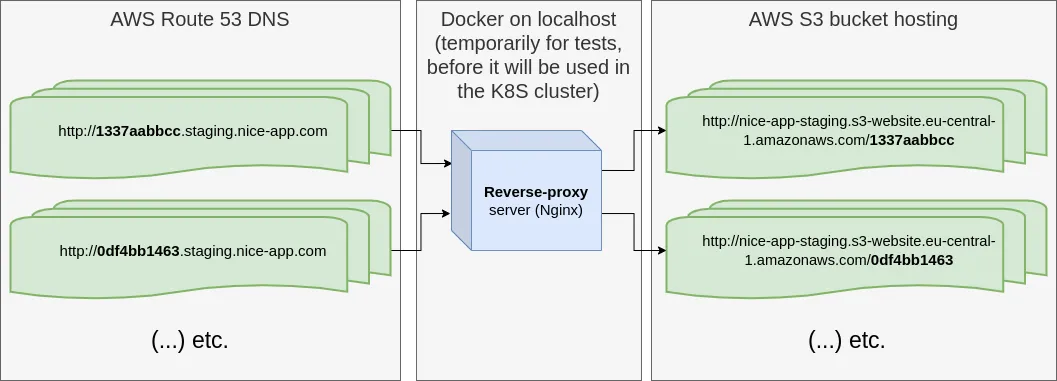
The third installment of the Preview environment for Code reviews series is here! In this one, we concentrate on configuring and implementing the Reverse-proxy server, which we need to route data between subdomains and subdirectories of an AWS S3 bucket.
Before you begin
This post is the third installment in a series of articles describing how to build a dedicated Preview environment for every Code Review (Merge Request).
So far, we have implemented GitLab CI/CD pipelines that create and close Preview environments in the Cloud.
This time the spotlight is on configuring and implementing the Reverse-proxy server, which we need in order to route data between subdomains and subdirectories of an AWS S3 bucket.
Running the Reverse-proxy server locally
Our first aim is to try it out locally in a Docker container, since this can be done without any complicated integration with the K8S cluster – something we will, naturally, also describe in upcoming articles.
Working this way lets us concentrate on the Reverse-proxy configuration itself and make sure we have ironed out any problems before deploying to the cluster, without having to think about K8S manifests just yet.
Picking a server implementation
First, let’s think about whether we need a tailor-made, dedicated server written from the ground up (for instance in Scala or Java), or whether a ready-made solution is the better option.
As far as the use case goes, the job of the Reverse-proxy server is fairly typical (it shows up in web application projects all the time), so there is no point in writing a server of our own. Instead, we can rely on an out-of-the-box solution that the OpenSource community has been refining for years, and which is also well-optimized and soundly written from a security standpoint.
The options available (based on the ranking of the best web servers in 2022) include:
- Apache httpd
- Nginx
- Lighttpd
- Caddy
- plus plenty of others…
We concluded that for our needs it made sense to look at the two most popular and broadly adopted ones: Apache httpd and Nginx.
Our Use Case is straightforward: we need a Reverse-proxy that filters wildcard subdomains. Here, Apache httpd needs more configuration files than Nginx, which is more compact in this regard (and far more pleasant to configure). On top of that, Nginx is something of a standard in Kubernetes clusters, so consistency also speaks in its favor. In the end, we went with Nginx.
If you’d like to know precisely how the two servers differ in performance, take a look at any of the countless blog posts comparing them, for example Apache vs. Nginx.
Initial (local) configuration of the server
Eventually, the Nginx server is meant to run in a container within a Pod in k8s, so our starting point is a Dockerfile for Docker:
FROM nginx:1.23.1

# custom configuration
COPY ./nginx.conf /etc/nginx/conf.d/default.conf
Here we take the official Docker Nginx image in version 1.23.1 and extend it with a custom configuration where the proxy will be defined.
This is what the nginx.conf configuration file looks like:
server_names_hash_bucket_size 64;

server {
    listen 80;

    server_name ~(.*)\.staging\.nice-app\.com$;
    set $subdomain $1;
    set $destination_domain 'nice-app-staging.s3-website.eu-central-1.amazonaws.com';

    location / {
        resolver 192.168.65.5; # docker localhost DNS resolver
        proxy_pass http://$destination_domain/$subdomain$uri$is_args$args;
    }
}
We start by setting server_names_hash_bucket_size 64;, since the hash names placed in the subdomain may turn out to be long. The default value is tied to the CPU cache (typically 32), but we increased it as a precaution, so that longer subdomains don’t cause trouble.
Next, we declare a new server listening on port 80, which captures subdomains matching the regexp pattern (.*)staging.nice-app.com$. The hash itself is pulled out of the subdomain and stored in the $subdomain variable.
Besides that, we already have the target domain set, namely the URL of the staging bucket in AWS S3 that we obtained earlier.
For every location / path, traffic gets forwarded to a URL assembled from the variables above together with Nginx’s built-in variables (such as $uri, i.e. the text following the domain, including any HTTP GET arguments in the URL).
The resulting formula is: “http://$destination_domain/$subdomain$uri$is_args$args”, which points to a subdirectory in the AWS S3 bucket.
We also define a DNS resolver at the IP address 192.168.65.5, which is reachable within the local Docker daemon environment. Why do we need it? Because we put variables inside Nginx’s proxy_pass instruction. In that case Nginx relies on an entirely different proxy mechanism than for a URL that is not dynamic (i.e. plain static text without variables). This issue comes up in plenty of StackOverflow threads.
Keep in mind that this address can vary across machines, operating systems, and Docker versions. It is therefore worth checking beforehand which IP address applies in your local setup (we won’t explain how, since there are numerous ways of doing it and they differ between Docker versions).
Getting ready to test locally
Once the Dockerfile and the nginx.conf file with the custom configuration are in place, we can start preparing for the tests.
To begin with, the application files have to be present in the staging bucket. For that, we create a new branch in the app’s Git repository and then use it to open a Merge Request in GitLab, which will kick off the deployment (via the CI/CD pipeline built in the previous article).
$ git checkout -b feature/test-MR
Switched to a new branch 'feature/test-MR'
$ "test" > TEST.md
$ git add .
$ git commit -m "testing MR deployment"

[feature/test-MR (root-commit) 8266b1c] testing MR deployment
 1 files changed, 0 insertions(+), 0 deletions(-)
 create mode 100644 TEST.md
$ git push --set-upstream origin feature/test-MR
The file was added purely for testing, so that once the MR was created, GitLab would launch the pipeline that uploads the new subdomain and the files to AWS.
After that, we manually opened a new Merge Request in GitLab with the feature/test-MR branch as the source and the main branch as the target.
The build-and-deploy-staging-for-review job in the Pipeline produced the following URL: “http://a4f194667b4fa23.staging.nice-app.com/”, in which a4f194667b4fa23 is the commit hash, serving as both the subdomain and the subdirectory in the AWS S3 staging bucket.
With the files and the hash ready, we can take advantage of an operating system feature that lets us point a domain at an IP address in the local environment.

This setting lives in a file located at /etc/hosts (Linux/Mac) or c:\Windows\System32\Drivers\etc\hosts (Windows). Open it with administrator privileges, append the line below, and save your changes:
127.0.0.1 a4f194667b4fa23.staging.nice-app.comAs a result, for the URL “http://a4f194667b4fa23.staging.nice-app.com”, the operating system will send us to the IP address 127.0.0.1, i.e. localhost, where the Docker daemon will be running with the Nginx docker image we defined a few paragraphs earlier.
Thanks to this trick, we can test and debug the Reverse-proxy server locally, without relying on AWS Route 53 for the “nice-app.com” DNS zone.
Running the tests locally
Next, go to the directory of the separate project holding the Reverse-proxy server files (we list them here to show which files were copied into it).
$ cd /home/nice-app-developer/projects/staging-reverse-proxy
$ ls
Dockerfile  nginx.conf
At this point we can start a Docker container from the image built out of these files (make sure Docker is installed and the Docker daemon is up).
$ docker build -t reverse-proxy .
$ docker run -it --rm -d -p 80:80 --name reverse-proxy-server reverse-proxy
Now we should be able to send a request to the server through the subdomain declared before. In response we ought to get the HTML code of the application whose files (index.html among them) were uploaded to AWS S3. The content below is just a sample, prepared so as not to dwell on the application itself here, but to illustrate what a server response like this could look like.
$ curl http://a4f194667b4fa23.staging.nice-app.com/
<html>
<head><title>Nice-app application</title></head>
<body>
<center>Hello!</center>
</body>
</html>
Issues with hosting from an AWS S3 bucket
Well done! The Reverse-proxy mechanism in the Nginx server has passed our tests. Bear in mind, though, that this is only the start of the road, because URLs in AWS S3 buckets follow their own particular patterns of behavior and come with their own problems, described below.
Problem 1: How hosting treats URLs with a trailing slash
Hosting files stored in an AWS S3 bucket works like this: when the URL ends with a slash / (a so-called “trailing slash”), the hosting server first looks for a directory under that path and then for an index.html file inside it, whose content it returns in the response.
So, for instance, for the URL “nice-app-staging.s3-website.eu-central-1.amazonaws.com/some-directory/”, you get the content of the file found at some-directory/index.html. If no such file exists, a 404 error page is shown (see the image below).
Things look different when the URL lacks a trailing slash. In that case AWS S3 hosting checks whether a file named some-directory (without an extension) exists, entirely disregarding the possibility that it is a directory rather than a file. So even when the some-directory subdirectory contains an index.html file, the page still won’t be displayed properly (example below).
With our current Nginx configuration, the proxy_pass function forwards every URL (both with and without a trailing slash) to AWS S3 hosting, so for URLs lacking a trailing slash we may end up with 404 error pages rather than the real application page (the HTML file content).
Solution
We can fix this with the rewrite function, which redirects every URL lacking a trailing slash to the same URL with a slash appended.
rewrite (.*[^\/])$ $1/ break;Problem 2: Redirecting slash-less URLs of assets (e.g. jpg, png, css, js, etc.).
The trailing slash issue is fixed, but in exchange we can no longer reach asset files. The newly added rewrite instruction now tacks a slash onto files like *.jpg, which makes AWS S3 search for an index.html file inside a directory whose name ends with .jpg/.
Solution
The most straightforward way around this is to divide URL path routing into two patterns: one handling files without a trailing slash, and another handling subpage URLs that have a trailing slash.
    location ~* (.*\.[A-Za-z]+)$ { # all files with extension
        resolver 192.168.65.5;
        proxy_pass http://$destination_domain/$subdomain$uri$is_args$args;
    }

    location / {
        resolver 192.168.65.5; # docker localhost DNS resolver
        # adding a trailing slash to the end of URL if it does not exist (needed for proxy_pass to open AWS S3 directory, then to search for index.html inside)
        rewrite (.*[^\/])$ $1/ break;
        proxy_pass http://$destination_domain/$subdomain$uri$is_args$args;
    }
As the code above shows, the extra pattern location ~* (.*[A-Za-z]+)$ matches URLs pointing to files with an extension that don’t end with a slash, and forwards them without any rewrite directive.
Problem 3: Nginx forwards URLs in decoded form
Files bring yet another problem: their names can include spaces and other special characters. Regrettably, when the $uri variable is used, Nginx by default turns already encoded URLs back into decoded form, and that is what gets handed to the proxy_pass function.
This setup would work just fine if AWS S3 were happy with such decoded URLs. As you may suspect, the service does not accept them.
For a file whose name includes spaces, such as file with space.png, AWS S3 hosting will show an error saying it couldn’t find the file.
On the other hand, the requested image will be located once we use an encoded URL, such as file%20with%20space.png (where %20 represents an encoded space).
Solution
The fix is to encode again the URL fragment that Nginx decoded for its processing. Because the function itself is fairly involved, we chose an Nginx server extension that provides it. The extension is named “OpenResty”, and the function we need is set_escape_uri.
To avoid spending time on installing the extension through extra lines in the Dockerfile, for this demo we opted for an Nginx docker image that is already set up with the required extension.
The Dockerfile now looks like this:
FROM openresty/openresty:1.21.4.1-3-buster-fat

# custom configuration
COPY ./nginx.conf /etc/nginx/conf.d/default.conf
And here is the complete nginx.conf configuration:
server_names_hash_bucket_size 64;

server {
    listen 80;

    server_name ~(.*)\.staging\.nice-app\.com$;
    set $subdomain $1;
    set $destination_domain 'nice-app-staging.s3-website.eu-central-1.amazonaws.com';

    location ~* (.*\.[A-Za-z]+)$ {
        resolver 192.168.65.5;
        set_escape_uri $escaped_uri $uri; # OpenResty Nginx module https://github.com/openresty/set-misc-nginx-module#set_escape_uri
        proxy_pass http://$destination_domain/$subdomain$escaped_uri$is_args$args;
    }

    location / {
        resolver 192.168.65.5; # docker localhost DNS resolver
        # adding a trailing slash to the end of URL if it does not exist (needed for proxy_pass to open AWS S3 directory, then to search for index.html inside)
        rewrite (.*[^\/])$ $1/ break;
        proxy_pass http://$destination_domain/$subdomain$uri$is_args$args;
    }
}
Quick recap
We chose a server implementation, put together a (Reverse-proxy) configuration, and dealt with the problems stemming from how URLs work in AWS S3 hosting. We also tested everything in a local environment with Docker. What we still lack, however, is a deployment to the cloud that would make the server available to the client company’s Kubernetes cluster.