Preview environments for Code reviews, part 5: Deploying to the Kubernetes cluster
This post is the fifth and last installment of an article series about building a dedicated Preview environment for every Code Review
The final missing piece: deploying the Reverse-proxy in Kubernetes
This post is the fifth and last installment of an article series describing how to build a dedicated Preview environment for every Code Review (Merge Request).
We already have a CI pipeline that publishes the Reverse-proxy server to a repository in the GCP Google Artifact Registry service.
Thanks to this, the Docker image is accessible from the Kubernetes cluster run by the client company.
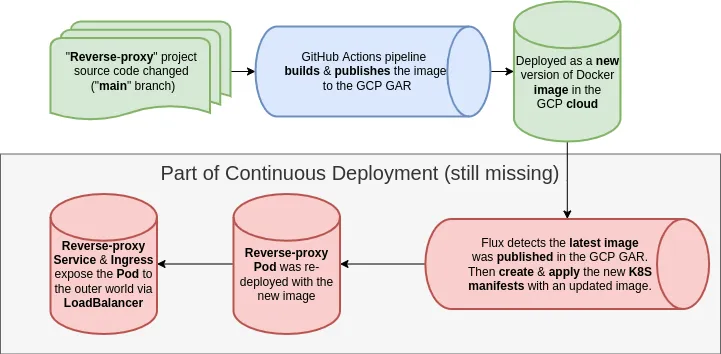
As you can see, what we still lack is Continuous Deployment within the Kubernetes cluster itself, together with the Deployment, Service, and Ingress manifests. This article is devoted exactly to that last missing piece: the CD of the Reverse-proxy in Kubernetes.
Kubernetes configuration
We will begin by creating a Reverse-proxy configuration for K8S, which belongs in the cluster management repository (the one that describes the infrastructure of every project in the Kubernetes cluster as IaC - Infrastructure as Code). It is required to specify how the individual components should behave so that they fulfill our requirements.
The “Deployment” manifest
To start with, we need the deployment definition itself, which is what keeps the container running. :)
The deployment.yml file:
apiVersion: apps/v1
kind: Deployment
metadata:
  labels:
    app: nice-app-staging-proxy
    app.kubernetes.io/name: nice-app-staging-proxy
  name: nice-app-staging-proxy
  namespace: default
spec:
  replicas: 1
  selector:
    matchLabels:
      app: nice-app-staging-proxy
  strategy: {}
  template:
    metadata:
      labels:
        app: nice-app-staging-proxy
    spec:
      containers:
        - image: europe-west2-docker.pkg.dev/nice-app/nice-app/staging-reverse-proxy:5c48100-1666639074 # {"$imagepolicy": "flux-system:nice-app-staging-proxy"}
          imagePullPolicy: Always
          readinessProbe:
            httpGet:
              path: /
              port: 80
          livenessProbe:
            httpGet:
              path: /
              port: 80
          name: nice-app-staging-proxy
          ports:
            - containerPort: 80
              name: http
      imagePullSecrets:
        - name: gcr-pull
status: {}
Most importantly, this is where we specify the Docker image pushed to GCP GAR, along with its latest tag and a comment telling the Flux tool where image changes should be applied (the so-called image-policy). Fluxbot will update this tag automatically, committing to the repository whenever a new image version shows up in the GCP GAR repository.
By the way: the URLs for readinessProbe and livenessProbe are required as well for the service to function properly. All labels and metadata are unified as nice-app-staging-proxy.
The “Service” manifest
Next, we have to define a “Service” manifest, which lets other services within the cluster see the Pods produced by the Deployment (visible in the sense of the local network).
The service.yml file:
apiVersion: v1
kind: Service
metadata:
  name: nice-app-staging-proxy
  namespace: default
  labels:
    app: nice-app-staging-proxy
spec:
  type: ClusterIP
  selector:
    app: nice-app-staging-proxy
  ports:
    - name: http
      protocol: TCP
      port: 80
      targetPort: http
status:
  loadBalancer: {}
Here too, the metadata is unified under the same name, nice-app-staging-proxy. The service is of type ClusterIP. Note that we expose port 80 as HTTP (unencrypted for now, since encryption isn’t needed here for internal traffic).
The “Ingress” manifest
To make the Service reachable from the outside (indirectly, via the next component, i.e. the LoadBalancer), we need a manifest defining an Ingress object.
The ingress.yml file:
apiVersion: networking.k8s.io/v1
kind: Ingress
metadata:
  name: nice-app-staging-proxy
  namespace: default
  annotations:
    kubernetes.io/ingress.class: nginx
    cert-manager.io/cluster-issuer: letsencrypt-issuer
  labels:
    app: nice-app-staging-proxy
    app.kubernetes.io/name: nice-app-staging-proxy
spec:
  rules:
    - host: "*.staging.nice-app.com"
      http:
        paths:
          - backend:
              service:
                name: nice-app-staging-proxy
                port:
                  number: 80
            path: /
            pathType: Prefix
  tls:
    - hosts:
        - "*.staging.nice-app.com"
      secretName: nice-app-staging-proxy-tls
status:
  loadBalancer: {}
Once again we unify the metadata, and we specify the hosts and subdomains the LoadBalancer should intercept in order to route traffic to this endpoint.
The LoadBalancer talks to the Service over port 80, while the LoadBalancer itself takes care of SSL encryption for requests coming from the outside world.
Here, the Let's encrypt Issuer is employed to issue SSL certificates for whatever subdomains may appear.
SSL certificates for wildcard subdomains
A little aside: generating SSL certificates for Wildcard subdomains (with ) requires a DNS-01 implementation (known as the “DNS challenge”) rather than HTTP-01 (for more technical details, take a look at this post).
Implementing DNS-01 is an involved topic, so we won’t try to cover it in this article – the series is already long enough as it is.
So what does cert-manager do when wildcards aren’t supported? It produces a self-signed SSL certificate, which might not be a trusted one, but still lets us open the Preview application page. Because the page is used by Developers rather than end users, we can leave out the DNS-01 implementation in this demo.
CD setup for the K8S manifests and the GCP image
Having prepared the initial Reverse-proxy configuration in K8s, we can take the next step and apply it in the repository that manages the cluster infrastructure.
For this we need an image-policy, whose name we already referenced in the deployment.yml file, plus an image-repository that specifies where the Docker image repository lives.
The image-policy.yml file:
apiVersion: image.toolkit.fluxcd.io/v1alpha2
kind: ImagePolicy
metadata:
  name: nice-app-staging-proxy
  namespace: flux-system
spec:
  filterTags:
    pattern: '^[a-fA-F0-9]+-(?P<ts>.*)'
    extract: '$ts'
  imageRepositoryRef:
    name: nice-app-staging-proxy
  policy:
    numerical:
      order: asc
Notice that the namespace differs here: it’s flux-system, since this is a separate part of the infrastructure dedicated to the Flux tool.
The image policy setting uses a filter expressed as a regexp to pull out just the timestamp; sorting these in ascending order then tells us which Docker image tag is the newest (the highest timestamp denotes the newest image).
The image-repository.yml file:
apiVersion: image.toolkit.fluxcd.io/v1alpha2
kind: ImageRepository
metadata:
  name: nice-app-staging-proxy
  namespace: flux-system
spec:
  image: europe-west2-docker.pkg.dev/nice-app/nice-app/staging-reverse-proxy
  interval: 1m0s
  secretRef:
    name: gcr-pull
The manifest for the repository source is really simple and likewise uses the flux-system namespace.
The “Kustomize” manifest
Lastly, all of these manifests have to be tied together. As mentioned at the start, the CD also relies on the Kustomize tool and Terraform. Terraform expects a new directory named the same as the manifests’ metadata (i.e. nice-app-staging-proxy), where it looks for a kustomization.yml file; that file is loaded and fills in the full list of manifest files, which reside in the same directory.
This is how this specific company handles its own K8s cluster in the infrastructure management project repository. Other companies or projects might approach it differently, but here we followed the directory and file structure already established in their solution.
That’s why, at the end, we need a kustomisation.yml file that ties everything together:
apiVersion: kustomize.config.k8s.io/v1beta1
kind: Kustomization
commonLabels:
  app: nice-app-staging-proxy
resources:
  - deployment.yml
  - service.yml
  - ingress.yml
  - image-policy.yml
  - image-repository.yml
Every manifest file we created in the new directory is committed to the repository, so that it gets executed during the various builds in GitHub Actions.
Adjusting the Nginx server configuration of the Reverse-proxy project for the Kubernetes cluster
In the earlier test setup of the Nginx server in the nginx.conf file, we relied on the IP address of the DNS resolver available locally in the Docker installation on the computer.
resolver 192.168.65.5; # docker localhost DNS resolverKubernetes, however, is a different story: a DNS resolver might be present there, might not exist at all, or access to it might be heavily limited. In our Nice-App use case, no such DNS resolver was at our disposal. So we chose to use the IP address of one of the publicly accessible DNS resolvers (here, Google’s Public DNS).
resolver 8.8.8.8 valid=10s ipv6=off; # public Google DNS resolverNaturally, you can add more servers to the list by providing an array of IP addresses, but for the demo we stuck with a single one. As you can see, two extra options are set here:
valid=10sextends the IP address timeout to 10 seconds; we need this because a public server can occasionally be unavailable, undergo maintenance, suffer network delays, and so on.ipv6=offturns off IPv6 for communication with the resolver, which shortens request processing time, since our staging environment has no need for IPv6
Once every line of code containing the resolver’s IP address has been updated, the nginx.conf file looks like this:
server_names_hash_bucket_size 64;

server {
    listen 80;

    server_name ~(.*)\.staging\.nice-app\.com$;
    set $subdomain $1;
    set $destination_domain 'nice-app-staging.s3-website.eu-central-1.amazonaws.com';

    location ~* (.*\.[A-Za-z]+)$ {
        resolver 8.8.8.8 valid=10s ipv6=off; # public Google DNS resolver
        set_escape_uri $escaped_uri $uri; # OpenResty Nginx module https://github.com/openresty/set-misc-nginx-module#set_escape_uri
        proxy_pass http://$destination_domain/$subdomain$escaped_uri$is_args$args;
    }

    location / {
        resolver 8.8.8.8 valid=10s ipv6=off;
        # adding a trailing slash to the end of URL if it does not exist (needed for proxy_pass to open AWS S3 directory, then to search for index.html inside)
        rewrite (.*[^\/])$ $1/ break;
        proxy_pass http://$destination_domain/$subdomain$uri$is_args$args;
    }
}
These modifications have to be committed to the GitHub repository, so that a fresh Docker image containing the updated Nginx configuration is pushed automatically to the GCP GAR repository; this in turn makes the Flux tool commit the new image version to the company’s cluster management repository, triggering a redeployment in the K8s cluster.
Testing the solution
Well done! We have arrived at the finish line of this long journey. Time to test the solution. One way is to use the cURL tool; for the URL generated earlier by the Preview environment for the Merge Request in GitLab, it should return the HTML code of the Nice-App application.
$ curl https://a4f194667b4fa23.staging.nice-app.com/
<html>
<head><title>Nice-app application</title></head>
<body>
<center>Hello!</center>
</body>
</html>
For this test, the Docker daemon on the local computer was turned off and we had already deleted the redirect for the URL above from the /etc/hosts file. This means DNS in AWS Route 53 did its job, sending us to the LoadBalancer in the Kubernetes cluster, where the Reverse-proxy server in turn issued a request to a subdirectory in the staging Bucket.
Summary
The path was a complex one (5 blog posts), but as you can see, it is within a Developer’s reach (as long as you read the documentation and think the problem through up front, before implementing anything).
Some of the solutions we found along the way, by exploring (for example, errors in proxy_pass in the Nginx server configuration caused by the particular way bucket hosting works in AWS S3). I hope it was an interesting read.
What’s more, we managed to stay within the assumptions set at the beginning, where the client wanted to rely on parts of the infrastructure it already maintained.
Alternative approaches
There are plenty of different ways to build Preview environments for Code Review. So I am aware that the approach presented in this article series might not be the best one available.
I invite you, dear reader, to share links in the comments to other examples of how Preview environments can be built. This will surely broaden the knowledge of those who, perhaps because of budget or legal limitations, are unable to build Preview the way described above.
People with very deep expertise in Nginx configuration will likely have something interesting to add as well.
As you’ve made it this far in the article, thank you in advance for your patience and for reading the whole series. Until next time!