Preview environment for Code reviews, part 4: publishing the Docker image to Artifact Registry
This article concentrates on getting the Docker image published in the cloud. It also gives a first look at the infrastructure a client uses to roll out Docker images from the cloud onto a Kubernetes cluster.
Picking up the Reverse-proxy thread
This post is the fourth installment in a series about setting up a dedicated Preview environment for every Code Review (Merge Request).
Up to this point we have configured the Reverse-proxy server and verified it locally inside a Docker container. What is still lacking is a deployment to the cloud, so that the Docker image becomes reachable by the Kubernetes cluster run by the client company.
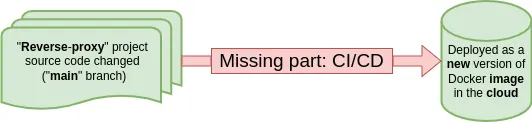
This article deals with exactly that gap, namely publishing the Docker image in the cloud (here, the target is a Google Artifact Registry repository). We will also give a first outline of the infrastructure the client relies on to roll out Docker images from the cloud onto a Kubernetes cluster.
How is CD handled in the K8s cluster?
Let’s quickly go over how Continuous Deployment (CD) is set up for the services running in the company’s Kubernetes cluster.
The DevOps tooling in place includes:
- Terraform - the de facto industry standard for IaC (Infrastructure as Code)
- Kustomize - a Kubernetes configuration manager that lets us generate configuration files from completed templates
- Flux - a GitOps tool, with all information about the project infrastructure kept and versioned in the git version control system.
The CD relies on every Docker image being kept in the GCP cloud (to be precise, in GAR - Google Artifact Registry).
Whenever a newer version shows up (carrying a suitably incremented tag), the image gets swapped automatically in the k8s deployment configuration, which in turn triggers a re-deployment using the fresh image.
Watching for new image versions is the job of the Fluxbot (Flux) tool, and Kustomize is used indirectly to produce the updated configuration.
Fluxbot makes a commit to the Git repository whose role is to manage the cluster to which the new configuration gets applied. At that moment the corresponding pipeline starts with the new deployment (through GitHub Actions). This is where all the “magic” happens.
What does that imply for us? Our Docker image for the Nginx-based Reverse-proxy server also has to be pushed to the GAR repository, so that it fits into the existing CD infrastructure.
Git repository for the Reverse-proxy server on GitHub
Picking a Git repository provider
Keep in mind that the client company works with two providers for its various Git repositories: GitHub and GitLab:
- The files of the Nice-app application live in the GitLab repository (the one we built CI/CD pipelines for in the second article)
- GitHub is an available option too (used mostly for infrastructure projects)
Our Reverse-proxy project counts as infrastructure. Since the company keeps the infrastructure projects that end up in the K8s cluster on GitHub, we stay consistent and set up the new repository on GitHub as well.
Setting up a repository
To begin with, we need a fresh Git repository whose only purpose is to hold the Dockerfile and the nginx.conf configuration.
Next, we put the previously defined Dockerfile and nginx.conf files on the main branch, commit them and push to GitHub.
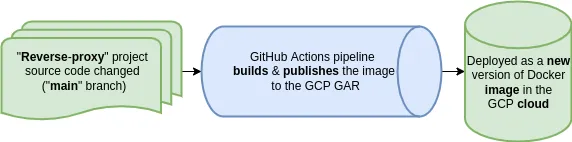
That gives us a foundation for a CI environment (built with GitHub Actions) that will automatically push the Docker image to GCP GAR whenever the main branch changes.
Docker image repository in the GCP Google Artifact Registry
Before any images can be pushed to a repository, one has to be created in GCP GAR. For that, we open the Google Cloud Console, look up the artifact registry service and navigate to its page. The Create Repository button lets us add a new repository, for example one named "nice-app/staging-reverse-proxy".
Publishing the Docker image to the GCP GAR automatically
Once the GAR repository exists, we can add the GitHub Actions CI configuration to the Reverse-proxy project. The file belongs in a subdirectory of the GitHub repository, at the path .github/workflows/google.yml. GitHub also offers generators for such configurations, handy if you want to start integrating with various services (AWS, GCP, etc.) on your own.
The google.yml file looks like this:
name: Build and Publish to GAR

on:
  push:
    branches: [ "main" ]

env:
  PROJECT_ID: ${{ secrets.GCP_PROJECT_ID }}
  GAR_LOCATION: europe-west2
  REPOSITORY: nice-app
  IMAGE: staging-reverse-proxy

jobs:
  setup-build-publish-image:
    name: Setup, Build, Publish, and Deploy
    runs-on: ubuntu-latest
    environment: production

    permissions:
      contents: 'read'
      id-token: 'write'

    steps:
      - name: Checkout
        uses: actions/checkout@v3

      # Authenticate to Google Cloud via credentials json
      - id: 'auth'
        name: Set up Cloud SDK
        uses: google-github-actions/auth@v0
        with:
          credentials_json: ${{ secrets.GCP_SA_KEY }}
          token_format: 'access_token'

      # Login to docker in Google Artifact Registry
      - name: Docker configuration
        run: |-
          echo ${{steps.auth.outputs.access_token}} | docker login -u oauth2accesstoken --password-stdin https://$GAR_LOCATION-docker.pkg.dev
      # Build the Docker image
      - name: Build
        run: |-
          export BUILD_TAG="${GITHUB_SHA:0:7}-$(date +%s)"
          echo "build_tag=$BUILD_TAG" >> $GITHUB_ENV # make it available for next steps
          docker build \
            --tag "$GAR_LOCATION-docker.pkg.dev/$PROJECT_ID/$REPOSITORY/$IMAGE:$BUILD_TAG" \
            --build-arg GITHUB_SHA="$GITHUB_SHA" \
            --build-arg GITHUB_REF="$GITHUB_REF" \
            .
      # Push the Docker image to Google Artifact Registry
      - name: Publish
        run: |-
          docker push "$GAR_LOCATION-docker.pkg.dev/$PROJECT_ID/$REPOSITORY/$IMAGE:${{ env.build_tag }}"
Let’s walk through what goes on here, one step at a time:
- The build is triggered only by a change on the
mainbranch. That is the usual approach, with this branch treated as production. - We declare the variables needed in the later build steps. These are, naturally, the path to the Docker repository we created earlier in GCP GAR, its location, and the project ID in the GCP cloud (where the k8s cluster lives).
The ${{ secrets.GCP_PROJECT_ID }} expression tells the CI to read the variable’s value from the secrets defined in the GitHub repository (a repository Administrator can add them). This way no sensitive data ends up in the project code.
-
In the first build step we then use the
actions/checkout@v3action, a GitHub Actions template that gives access to the files in this repository. -
The following build step uses the
google-github-actions/auth@v0action to authenticate us in the GCP cloud, again relying on a secret that the administrator configured in the GitHub repository. -
We log in to Docker at Google Artifact Registry (to which we now have access).
-
We build the Docker image from the repository’s files. This stage breaks down into a few steps:
a) We define the variableBUILD_TAG="${GITHUB_SHA:0:7}-$(date +%s)". It holds the tag name the image will receive when it is later published to GCP GAR. It joins the first 8 characters of the$GITHUB_SHAvariable (the SHA of the commit that started the workflow) with the timestamp of the current moment in UNIX format. Later on, we will rely on this timestamp component to sort the Docker images by most recent tags.
b) We also export it into GitHub Actions’ global variable space, so the tag can be used in later steps too.
c) We build a Docker image marked with the right tags. -
We publish the resulting docker image to the GCP GAR repository, tagging it with the tag generated before.
Running the job on GitHub Actions
Time to test the setup: after a new commit lands on the main branch, the GitHub Actions tab should show a build that pushed this image to the repository.
The outcome of deploying the image to GCP GAR: several freshly uploaded images, each carrying a tag constructed according to the rules (e.g. 5c48100-1666639074, where the first part is the abbreviated SHA of the commit and the second one is the UNIX time).
Short recap
One more step done! From now on the server image is ready to be used in the client’s Kubernetes cluster (since the cluster can reach the repositories in GCP GAR).
The next article (part 5) will cover preparing manifests for the Kubernetes cluster that run the Reverse-proxy docker image in a new Pod and make it publicly accessible (through Ingress and Service objects). That is the last missing piece of the complete solution.